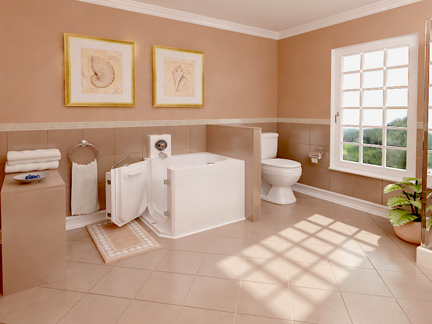
Installing a walk in bathtub can protect yourself and others from serious injury by making it easier to get in and out of your tub with no strain or effort. This simple walk in tubs installation and using instruction should take no more than 3 min to read and provide you with the information you need to know before you start.
Test the tub before Installation
Before you follow the installation steps in the walk in tubs installation and using instruction section below, it is vital to clean and test your tub before you begin. Doing so will catch any potential problems that may otherwise occur, such as leaks or complex operations. During the following steps, you will:
- Place the tub on a safe flat surface in an outdoor environment
- Wipe down the inside of the seal and the tub to keep it debris-free
- Plug up the hole and fill the tub nearly up to the safety bar
- Keep the water in the tub for at least 30 minutes
- Watch for any leaks and carefully repair them as needed
If, for any reason, you have leaks that cannot be repaired, contact the tub manufacturer or read your walk in tubs installation and using instruction. Check your user guide to walk in tubs to see any other problems you may have missed. Most of the time, your tub should be just fine after you perform this simple operation. If so, you can proceed to the installation steps below to get your tub in place properly.
Prepare the Tub Further
At this point, you need to prepare the tub site to ensure that it is proper and safe. These steps are usually done just before installing the tub to ensure that no problems occur when least expected. The following steps should help to prepare your tub installation site and ensure that it can easily fit within the grooves and the installation area where you have planned to place it:
- Remove the previous tub or prepare the area where you will install the new one
- Clear the area of any garbage, debris, or trash that may be lingering
- Scrub the floor of any mildew or mold growing on its surface
- Check the floor’s levelness and adjust it as needed to make it level
- Rough-in the drainpipe at the proper location based on your tub
- Additional Step: Inspect the electrical elements if your tub has a pump
Some walk in tubs will have a plug-in pump that will produce a whirling sensation via jets. Other tubs do not possess these jets. We will note in the following sections when you need to change your approach to suit this need. Thankfully, you’ll likely have to do very little to get good results when installing a tub with jets. They are designed to be easy to integrate into your overall tub operation.
Installation Process
At this point in this walk in bathtub operation manual, you’re ready to begin the installation. During these steps, you will:
- Place the tub inside of the area where you want to install it
- Properly level the tub and measure the distance between it and the wall
- Mark off the trim lines of the tub on the front and top panels
- Cut along the trim lines using a sharp blade
- Write down a line on the wall that is parallel to the tub’s top
- Create a vertical line parallel to the tub wall
- Insert three wood stringers three-eights of an inch below the liners
- Carefully shim the tub to help it reach the desired fit
- Remove the tub and insert the top panel according to your lines
- Hold the panels in place with clamps
- Put the tub back beneath these panels and remove the clamps
- Check the level of the tub and shim again
- Seal the panels in place with silicone once they are level
- Place the tub back in place and level the tub again
- Put the extension panels in place and seal them in place
- Insert your tub back into place and seal it beneath its panels
- Add the drain/overflow assembly to the tub alongside the sides
- Install the threshold drain to the system to prevent overflow
- Seal everything down in your tub and hold it in place with clamps
- Test the door a few times to make sure it locks against the panels
- Let the tub sit in place for at least 24 hours or longer before using
You may want to reach out to a professional maintenance expert to inspect your tub if you don’t feel comfortable. They will make sure that everything has properly sealed and that your tub is set in place with minimal difficulty.
